[jNetPcap] 자바에서 패킷 캡쳐를 위한 jNetPcap 개발 환경 구축하기
류명운
·2016. 11. 15. 02:36
[jNetPcap] 자바에서 패킷 캡쳐를 위한 jNetPcap 개발 환경 구축하기
jNetPcap 이란?
- libpcap 라이브러리의 모든 호출 용 Java 라이브러리
- 캡처 한 패킷을 실시간으로 디코딩 가능
- 네트워크 프로토콜(핵심 프로토콜)의 대규모 라이브러리를 제공
- 사용자는 Java SDK를 사용하여 자신의 프로토콜 정의를 쉽게 추가
Java Platform 에서 패킷 캡쳐(Packet Capture)를 수행하기 위해 WinPcap을 Java에서 사용가능하도록 포팅한 jNetPcap Lib를 이용해보려 한다. 이와 관련하여 개발 환경 구축 및 패킷 캡쳐 샘플 프로젝트를 실행해보는 본 포스팅의 순서는 다음과 같다.
- WinPcap 다운로드 및 설치하기
- jNetPcap 다운로드 및 프로젝트에 jnetpcap.jar, jnetpcap.dll 파일 추가하기
- 샘플 프로젝트 실행해보기
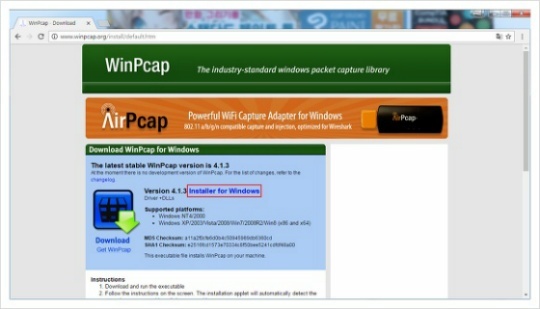
1. WinPcap 다운로드 및 설치하기
* Download URL - http://www.winpcap.org/install/default.htm
설치 파일을 공식 홈페이지에서 다운로드한 뒤 설치를 진행하여 준다.
2. jNetPcap 다운로드 및 프로젝트에 jnetpcap.jar, jnetpcap.dll 파일 추가하기
* Download URL - http://jnetpcap.com/
자신의 운영체제 및 버전에 맞는 파일을 다운로드하여 준다. (본인의 경우 Windows 32bit 선택)
다운로드 받은 파일의 압축을 풀면 아래와 같은 파일들이 존재하는데 프로젝트를 실행하기 위해 실제 필요한 파일은 jnetpcap.jar와 jnetpcap.dll 이 되겠다.
이클립스(자신이 사용하는 IDE)에서 패킷 캡쳐 샘플 프로젝트를 만들어준다.
프로젝트(PacketCapture) 하위에 Lib 폴더를 생성하여 준 뒤, jnetpcap.jar 및 jnetpcap.dll 파일을 Copy files 해준다.
프로젝트(PacketCapture) 우클릭 → [Build Path] → [Configure Build Path..] → [Add JARs..] → jnetpcap.jar 라이브러리를 추가하여 준다.
3. 샘플 프로젝트 실행해보기
다음으로 클래스 파일을 생성하여 jnetpcap.dll 라이브러리를 로드하여주는 코드를 작성하여 추가해준다.
public class PacketCapture {
	// 정적으로 jnetpcap.dll 파일 로드
	static {
		try {
			// native Library Load
			System.load(new File("jnetpcap.dll").getAbsolutePath());
			System.out.println(new File("jnetpcap.dll").getAbsolutePath());
		} catch (UnsatisfiedLinkError e) {
			System.out.println("Native code library failed to load.\n" + e);
			System.exit(1);
		}
	}

	public static void main(String[] args) {
        //..미작성
    }

}
이어서 공식 사이트에서 제공하는 패킷 캡쳐 예제 소스를 추가하여 실행해본다.
* 기본 예제 - http://jnetpcap.com/?q=examples/classic
import java.io.File;
import java.util.ArrayList;
import java.util.Date;
import java.util.List;

import org.jnetpcap.Pcap;
import org.jnetpcap.PcapIf;
import org.jnetpcap.packet.PcapPacket;
import org.jnetpcap.packet.PcapPacketHandler;

public class PacketCapture {
	static {
		try {
			System.load(new File("jnetpcap.dll").getAbsolutePath());
			System.out.println(new File("jnetpcap.dll").getAbsolutePath());
		} catch (UnsatisfiedLinkError e) {
			System.out.println("Native code library failed to load.\n" + e);
			System.exit(1);
		}
	}

	public static void main(String[] args) {
		List<PcapIf> alldevs = new ArrayList<PcapIf>();
		StringBuilder errbuf = new StringBuilder();
		int r = Pcap.findAllDevs(alldevs, errbuf);
		if (r == Pcap.NOT_OK || alldevs.isEmpty()) {
			System.err.printf("Can't read list of devices, error is %s", errbuf.toString());
			return;
		}
		System.out.println("Network devices found:");
		int i = 0;
		for (PcapIf device : alldevs) {
			String description = (device.getDescription() != null) ? device.getDescription()
					: "No description available";
			System.out.printf("#%d: %s [%s]\n", i++, device.getName(), description);
		}

		PcapIf device = alldevs.get(0);
		System.out.printf("\nChoosing '%s' on your behalf:\n",
				(device.getDescription() != null) ? device.getDescription() : device.getName());

		int snaplen = 64 * 1024;
		int flags = Pcap.MODE_PROMISCUOUS;
		int timeout = 10 * 1000;
		Pcap pcap = Pcap.openLive(device.getName(), snaplen, flags, timeout, errbuf);

		if (pcap == null) {
			System.err.printf("Error while opening device for capture: " + errbuf.toString());
			return;
		}

		PcapPacketHandler<String> jpacketHandler = new PcapPacketHandler<String>() {
			public void nextPacket(PcapPacket packet, String user) {
				System.out.printf("Received packet at %s caplen=%-4d len=%-4d %s\n",
						new Date(packet.getCaptureHeader().timestampInMillis()), packet.getCaptureHeader().caplen(),
						packet.getCaptureHeader().wirelen(), user);
			}
		};

		pcap.loop(10, jpacketHandler, "jNetPcap rocks!");
		pcap.close();
	}
}
* 38번째 줄의 alldeve.get()의 인자 값에 캡쳐할 네트워크 장치의 번호를 맞추어 주어야 한다.
해당 파일을 실행하였을 때 위와 같이 이상없이 실행된다면 이상없이 jNetPcap의 개발환경 구축이 완료된 것이다.
* 패킵 캡쳐(생성) 예제 프로그램 - [공개용 S/W 개발] Packet Flooder (DOS)
'삶의 늪에 들어 가기 전 > 정리중(미정리)' 카테고리의 다른 글
| [코드규칙] 헝가리안 표기법(Hungarian Notation) (0) | 2016.11.17 |
|---|---|
| [Git] Git + SourceTree 환경구축 (0) | 2016.11.16 |
| [머신러닝] 지도학습 검증방법 (Accuracy, Sensitivity, Specificity, Precision, ROC, AUC) (3) | 2016.11.12 |
| [nodejs] Node.js 개발에 필요한 기본 소양 (0) | 2016.10.14 |
| [로또 결과 예측] 기계학습 기반 로또 결과예측 프로그램 개발하기(미완) (4) | 2016.10.01 |


